
3D Detailing is what makes every piece of art complete. It adds a layer of realism to the image or sculpture, giving it more appeal or even relatable to the beholder. 3D designing is also a form of art. 3D designs require accurate description to ensure it is robust and connected to the viewer.
This article promises to give you an overview of 3D texturizing along with a hand-picked list of the best texturization software. Read on!
What is 3D texturizing?
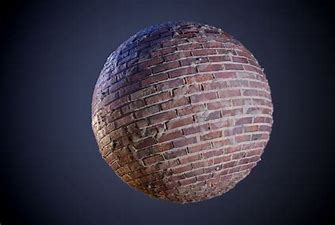
A crucial step in the creation of 3D models is texturing. A 3D artist’s use of texture gives characters in 3D modeling their finer details, such as wrinkles and individual carpet fibers. Typically, a program’s flat grey default color is used for the 3D models that are produced. 2D pictures must be laid out on 3D models to incorporate colors, patterns, and textures. A further stage in the 3D modeling pipeline, known as 3D texturing, is needed to add colors or surface and material attributes to a 3D model. The entire color and surface qualities of a 3D model are typically the outcomes of this method.
Why is 3D texturization important?
You might think of texturing as the process of dressing up 3D models. 3D texturing is wrapping a 2D image around a 3D object to simulate how light might interact with it. Another name for it is PBR or physical-based rendering.
The task of giving 3D objects color and surface characteristics falls to texture artists. The model’s surface should be identical to its concept art design or real-world counterpart. The texture artist’s task, for instance, would be to guarantee that the 3D Rocky Surface has the same color and surface characteristics as a real-world rock when rendered if the model is intended to represent a rock surface. Similarly, a polished metal surface ought to appear shiny.
Different software packages have various tools and processes for adding texture to a 3d product animation model. A texture artist can manually paint textures onto a model or even use real photographs to give it a more realistic or intricate appearance. The texturing stage of the 3d product animation pipeline includes rendering, unwrapping, texture painting, and shading. The rendering phase of a 3d product animation will employ textured models.
What are the goals of texturization?
When texturing a 3D object, the material, light effects, and surface details are the three fundamental characteristics of each surface that should be represented. In a 3D environment, an object’s texture can significantly influence the viewer’s perception of the substance of the thing. To give viewers a sense of what the thing is composed of just by looking at it is the fundamental purpose of 3D texturing.
The impact of the light is yet another critical factor. Every object in the real world displays unique characteristics when exposed to light, such as reflection, refraction, emissivity, etc. The same attributes must be given to 3D objects built of the same material in a 3D dynamic world.
If every detail on the surface of a 3D object had to be created at the 3D modeling stage, processing 3D objects would be an immense pain for both 3D software and, of course, the 3D artist. This issue can be solved by 3D texturing, which enables us to add microscopic details to the surface of the models without overtaxing the technology or software. These details include wrinkles, scars, fissures, and lumps. Many different types of textures and texture mapping can be used to give a 3D model a more realistic appearance in a 3D environment.
Painting surface textures on animated objects, locations, and characters is the responsibility of a texture artist. Among the textures that animators work with include fur, scales, wrinkles, sweat, and dirt. The surfaces utilized in animation are occasionally challenging to find in the natural world. The texture artist creates textures in these situations using his creativity and imagination. It turns into a time-consuming task. PBR texture libraries are therefore accessible for this.
What does the texturing process in 3D designing involve?
- UV Mapping, unwrapping: The model must first be unwrapped, which is essentially the same as unfolding a 3D mesh before you can start the 3D texturing procedure. The texture artists will create a UV map for each 3D object after the 3D modeling department delivers the finished models. A UV map is a rapid way to wrap textures because it is a flat representation of a 3D model’s surface. SUVs are representations of three-dimensional models in two dimensions. UV mapping can help wrap a 2D image (texture) around a 3D object by directly connecting a 2D image (texture) to vertices on a polygon. The generated map can then be used in the texturing and shading process.
There are a few tools or methods for unwrapping 3D models in most 3D software systems. When it comes to UV map creation, it depends on the individual. Unwrapping a 3D model in the texturing component is usually necessary unless you want to use procedural textures. These textures were created by a mathematical procedure rather than from 2D or 3D data that was physically recorded. Especially for characters, most unwrapping is done by hand. Although manual unwrapping takes a little longer, painting is significantly simpler as a result. Additional automatic methods are available, which are useful for less significant items like background props.
- Shading and texturing: For an object to be credible and appealing, its whole appearance and relationship with light must be accurately portrayed. The viewer’s mind may reject an inappropriate material or surface property. This captures the overall objective of the coexisting texturing and shading operations. The term “texturing” or “shading” refers to a set of processes that control how light interacts with a 2D image, which is what is typically meant by the term “texture.”
- Lighting and rendering process: Calculating the multiple maps allocated to the object’s shader as well as the lighting is the process of rendering. Texturing, 3D lighting and rendering methods are all interdependent in some way. Choosing your texture mappings based on the render engine you’ll be using at the end of the manufacturing stage is, therefore, crucial.
- Texture mapping: Texture mapping is a technique for establishing high-frequency detail, visual attributes, surface texture, or color information on a computer-generated visual or 3D model. Some often used texture maps include Albedo/Base Color, Normal, Displacement/Height, Diffuse, Specularity/Reflection, Roughness/Glossiness, Metalness, Ambient Occlusion, Refraction, Emissive, etc.
Popular texturization software
Cinema4D:
Cinema 4D is a widely regarded 3D program in the animation industry, created by the German company Maxon; a powerful program that enables you to create stunning graphics and special effects. It is renowned for being accessible and simple to learn, and it has a tonne of beginner-friendly lessons available. Due to its variety and dynamic options, several studios solely provide Cinema 4D.
Blender:
Blender is a free-to-use open-source program that performs a wide range of 3D operations beyond texturing, such as rendering, rigging, motion tracking, and more. It is an excellent option for beginners wishing to enter the field of animation. For CG artists, Blender offers a user-friendly interface, a powerful rendering engine, and all the necessary sculpting and texture tools. Because Blender is open-source and free, a sizable community is constantly working to improve the program and support beginner animators.
Adobe Photoshop:
Photoshop is undoubtedly a familiar software to everyone. It is one of the most valuable tools in the Adobe Creative Suite. Tonnes of helpful videos, tutorials, and online courses may help you master the fundamentals if you’re just starting out as an animator because it has been a mainstay of the business for such a long time. CG artists can employ a variety of brand-new, functional effects computer plugins with Photoshop. It delivers all essential 3D features, including 3D printing, personalized textures, and maps. Another helpful feature is exporting the finished texture to another program by saving it as a PNG file type.
Adobe Substance painter:
Substance Painter is a more recent addition to the Adobe Creative Suite. The main purpose of Substance Painter is texture modeling. With its complex masking and procedural texturing features, you can build textures that are more difficult to generate in 2D programs like Photoshop. As a result, Substance Painter has quickly become the industry’s top tool for digitally painting and texturing 3D objects.
Takeaway
3D texturizing is essentially the refinement step involved in the 3D designing process. A 3D designer uses texturization techniques and tools to add a layer of realism to the subject by giving it the right texture of the material, lighting effects, and suitable surface detailing. 3D designs would look plain and devoid of depth or realism without texturization. Appearances like that go against the very reasons for which 3D designing came into existence. If you are new to 3D designing and want to learn 3D designing the proper way, SelfCAD is the right tool for you due to the Interactive tutorials and the intuitive tools. Learn 3D designing faster with SelfCAD.


